If you work with Excel, you undoubtedly have been asked to create summaries of your work.
Sales reports, invoices, forecasts, schedules, you name it.
You know what all these documents have in common? They look great in PDF form. You know what else? Management loves PDFs!
This Tutorial Covers:
In this tutorial, I’ll show you how to use Excel VBA to convert all kinds of Excel objects to PDFs:
I’m going to present each of the macros with some commentary. That way, you’ll be able to quickly find them, copy them to your VBA editor and use them.
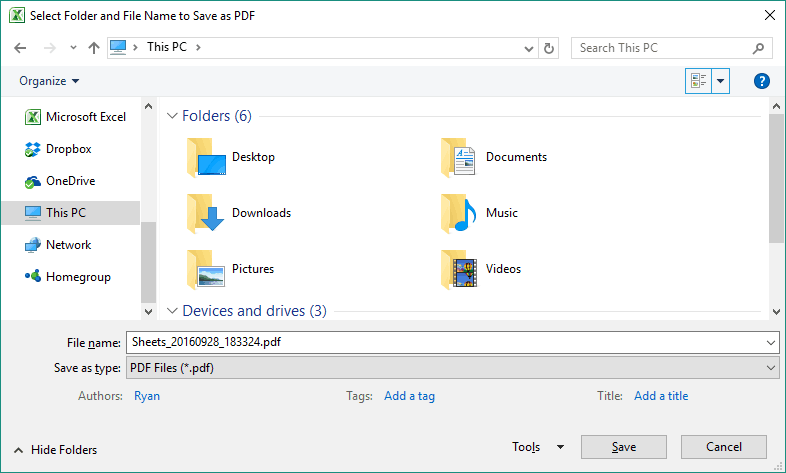
When you run any of these macros, a Save As dialog box will appear asking you where you want to save your PDF. The default name includes the date and timestamp when you executed the macro in yyyymmdd_hhmmss format.
Let’s get right to it.
Here are the macros:
This one is my personal favorite. This macro will convert the cells you actively have selected into a PDF.
If you only have one cell selected, the VBA macro is smart enough to realize that you probably don’t want to convert just one cell so it asks you to select the range you want to convert:

Sub PrintSelectionToPDF() 'SUBROUTINE: PrintSelectionToPDF 'DEVELOPER: Ryan Wells 'DESCRIPTION: Print your currently selected range to a PDF Dim ThisRng As Range Dim strfile As String Dim myfile As Variant If Selection.Count = 1 Then Set ThisRng = Application.InputBox("Select a range", "Get Range", Type:=8) Else Set ThisRng = Selection End If 'Prompt for save location strfile = "Selection" & "_" _ & Format(Now(), "yyyymmdd_hhmmss") _ & ".pdf" strfile = ThisWorkbook.Path & "\" & strfile myfile = Application.GetSaveAsFilename _ (InitialFileName:=strfile, _ FileFilter:="PDF Files (*.pdf), *.pdf", _ Title:="Select Folder and File Name to Save as PDF") If myfile <> "False" Then 'save as PDF ThisRng.ExportAsFixedFormat Type:=xlTypePDF, Filename:= _ myfile, Quality:=xlQualityStandard, IncludeDocProperties:=True, _ IgnorePrintAreas:=False, OpenAfterPublish:=True Else MsgBox "No File Selected. PDF will not be saved", vbOKOnly, "No File Selected" End If End Sub
Once you select the range and click OK, it will show a dialog box where you can select where you want to save the PDF.
It will automatically pick the date and time from your system’s clock and add it to the file name.
A lot of Excel power users store their data into organized tables. As a matter of fact, Sumit Bansal himself likes Excel tables so much he calls them a hidden treasure in Excel.
This macro prints a table of your choosing to a PDF. When you run the macro, it will prompt you for the name of the table you want to save.

Sub PrintTableToPDF() 'SUBROUTINE: PrintTableToPDF 'DEVELOPER: Ryan Wells 'DESCRIPTION: Print a table of your choosing to a PDF Dim strfile As String Dim myfile As Variant Dim strTable As String, r As Range Application.ScreenUpdating = False 'Enter the table name you want to save strTable = InputBox("What's the name of the table you want to save?", "Enter Table Name") 'Table you want to save If Trim(strTable) = "" Then Exit Sub 'Prompt for save location strfile = strTable & "_" _ & Format(Now(), "yyyymmdd_hhmmss") _ & ".pdf" strfile = ThisWorkbook.Path & "\" & strfile myfile = Application.GetSaveAsFilename _ (InitialFileName:=strfile, _ FileFilter:="PDF Files (*.pdf), *.pdf", _ Title:="Select Folder and File Name to Save as PDF") If myfile <> "False" Then 'save as PDF Range(strTable).ExportAsFixedFormat Type:=xlTypePDF, Filename:=myfile, Quality:=xlQualityStandard, _ IncludeDocProperties:=True, IgnorePrintAreas:=False, OpenAfterPublish:=True Else MsgBox "No File Selected. PDF will not be saved", vbOKOnly, "No File Selected" End If Application.DisplayAlerts = False LetsContinue: With Application .ScreenUpdating = True .DisplayAlerts = True End With Exit Sub End Sub
Once you enter the name of the table and click OK, it will show a dialog box where you can select where you want to save the PDF.
It will automatically pick the date and time from your system’s clock and add it to the file name.
If your spreadsheet has several tables and you need to save each one to a separate PDF, you can run this VBA code.
When you run this macro, a dialog box will appear asking you to select the folder where you want to save your PDFs.

Once you pick your folder, the macro will save each table to a PDF with the table name conveniently appearing in the title of the PDF.
Sub PrintAllTablesToPDFs() 'SUBROUTINE: PrintAllTablesToPDFs 'DEVELOPER: Ryan Wells 'DESCRIPTION: Print each table in your spreadsheet to a different PDF Dim strTables() As String Dim strfile As String Dim ch As Object, sh As Worksheet Dim icount As Integer Dim myfile As Variant Dim tbl As ListObject Dim sht As Worksheet With Application.FileDialog(msoFileDialogFolderPicker) .Title = "Where do you want to save your PDF?" .ButtonName = "Save Here" .InitialFileName = ThisWorkbook.Path If .Show = -1 Then ' if OK is pressed sfolder = .SelectedItems(1) Else End End If End With For Each sht In ThisWorkbook.Worksheets For Each tbl In sht.ListObjects myfile = ThisWorkbook.Name & "" & tbl.Name & "" _ & Format(Now(), "yyyymmdd_hhmmss") _ & ".pdf" myfile = sfolder & "\" & myfile sht.Range(tbl.Name).ExportAsFixedFormat Type:=xlTypePDF, Filename:= _ myfile, Quality:=xlQualityStandard, IncludeDocProperties:=True, _ IgnorePrintAreas:=False, OpenAfterPublish:=True Next tbl Next sht End Sub
I don’t know about you, but in my line of work, we have to retain PDF copies of almost all our spreadsheets. We append the PDF copies of our spreadsheets to our design calculations. These PDFs used to be converted to microfiche and vaulted for long-term retention. You know, in case the apocalypse happened.
If you find yourself in a similar situation, it’s nice to be able to automatically convert all the sheets in your spreadsheet into one PDF. Here’s a VBA macro that will do just that:
Sub PrintAllSheetsToPDF() 'SUBROUTINE: PrintAllSheetsToPDF 'DEVELOPER: Ryan Wells 'DESCRIPTION: Combine all your worksheets into one PDF Dim strSheets() As String Dim strfile As String Dim sh As Worksheet Dim icount As Integer Dim myfile As Variant 'Save Chart Sheet names to an Array For Each sh In ActiveWorkbook.Worksheets If sh.Visible = xlSheetVisible Then ReDim Preserve strSheets(icount) strSheets(icount) = sh.Name icount = icount + 1 End If Next sh If icount = 0 Then 'No charts found. Punch error MsgBox "A PDF cannot be created because no sheets were found.", , "No Sheets Found" Exit Sub End If 'Prompt for save location strfile = "Sheets" & "_" _ & Format(Now(), "yyyymmdd_hhmmss") _ & ".pdf" strfile = ThisWorkbook.Path & "\" & strfile myfile = Application.GetSaveAsFilename _ (InitialFileName:=strfile, _ FileFilter:="PDF Files (*.pdf), *.pdf", _ Title:="Select Folder and File Name to Save as PDF") If myfile <> "False" Then 'save as PDF ThisWorkbook.Sheets(strSheets).Select ActiveSheet.ExportAsFixedFormat Type:=xlTypePDF, Filename:= _ myfile, Quality:=xlQualityStandard, IncludeDocProperties:=True, _ IgnorePrintAreas:=False, OpenAfterPublish:=True Else MsgBox "No File Selected. PDF will not be saved", vbOKOnly, "No File Selected" End If End Sub
This macro converts all your Chart Sheets into one PDF – but not your chart objects! By chart sheets, I mean the charts that have their own tab in your list of spreadsheet tabs:

Sub PrintChartSheetsToPDF() 'SUBROUTINE: PrintChartSheetsToPDF 'DEVELOPER: Ryan Wells 'DESCRIPTION: Combine all chart sheets into one PDF Dim strSheets() As String Dim strfile As String Dim ch As Object, sh As Worksheet Dim icount As Integer Dim myfile As Variant 'Save Chart Sheet names to an Array For Each ch In ActiveWorkbook.Charts ReDim Preserve strSheets(icount) strSheets(icount) = ch.Name icount = icount + 1 Next ch If icount = 0 Then 'No charts found. Punch error MsgBox "A PDF cannot be created because no Chart Sheets were found.", , "No Chart Sheets Found" Exit Sub End If 'Prompt for save location strfile = "Charts" & "_" _ & Format(Now(), "yyyymmdd_hhmmss") _ & ".pdf" strfile = ThisWorkbook.Path & "\" & strfile myfile = Application.GetSaveAsFilename _ (InitialFileName:=strfile, _ FileFilter:="PDF Files (*.pdf), *.pdf", _ Title:="Select Folder and File Name to Save as PDF") If myfile <> "False" Then 'save as PDF ThisWorkbook.Sheets(strSheets).Select ActiveSheet.ExportAsFixedFormat Type:=xlTypePDF, Filename:= _ myfile, Quality:=xlQualityStandard, IncludeDocProperties:=True, _ IgnorePrintAreas:=False, OpenAfterPublish:=True Else MsgBox "No File Selected. PDF will not be saved", vbOKOnly, "No File Selected" End If End Sub
This macro saves all your normal charts – chart objects – into a single PDF. Regardless of which worksheet your chart is on, it will be grabbed and saved to a PDF.
There will only be one chart per page in the final PDF.
Sub PrintChartsObjectsToPDF() 'SUBROUTINE: PrintChartsObjectsToPDF 'DEVELOPER: Ryan Wells 'DESCRIPTION: Combine all chart objects into one PDF Dim ws As Worksheet, wsTemp As Worksheet Dim chrt As ChartObject Dim tp As Long Dim strfile As String Dim myfile As Variant Application.ScreenUpdating = False Set wsTemp = Sheets.Add tp = 10 With wsTemp For Each ws In ActiveWorkbook.Worksheets If ws.Name = wsTemp.Name Then GoTo nextws: For Each chrt In ws.ChartObjects chrt.Copy wsTemp.Range("A1").PasteSpecial Selection.Top = tp Selection.Left = 5 If Selection.TopLeftCell.Row > 1 Then ActiveSheet.Rows(Selection.TopLeftCell.Row).PageBreak = xlPageBreakManual End If tp = tp + Selection.Height + 50 Next nextws: Next ws End With 'Prompt for save location strfile = "Charts" & "_" _ & Format(Now(), "yyyymmdd\_hhmmss") _ & ".pdf" strfile = ActiveWorkbook.Path & "\" & strfile myfile = Application.GetSaveAsFilename _ (InitialFileName:=strfile, _ FileFilter:="PDF Files (*.pdf), *.pdf", _ Title:="Select Folder and File Name to Save as PDF") If myfile <> False Then 'save as PDF wsTemp.ExportAsFixedFormat Type:=xlTypePDF, Filename:=myfile, Quality:=xlQualityStandard, _ IncludeDocProperties:=True, IgnorePrintAreas:=False, OpenAfterPublish:=True 'Else ' MsgBox "No File Selected. PDF will not be saved", vbOKOnly, "No File Selected" End If Application.DisplayAlerts = False wsTemp.Delete With Application .ScreenUpdating = True .DisplayAlerts = True End With Exit Sub End Sub
If you have any questions, drop them in the comments section, where Ryan and I will be waiting there for you.
You May Also Like the Following Excel Tutorials:
About the author: Ryan Wells is a Nuclear Engineer and professional VBA Developer. He publishes his easy to understand Excel VBA tutorials to help others write better macros. In addition to teaching VBA, Ryan is the lead developer of several Excel add-ins . You can find his tutorials on WellsR.com .
FREE EXCEL BOOK
Hello there! I'm Sumit Bansal, founder of trumpexcel.com and an Excel MVP. I started this website in 2013 with a simple goal: to share my love for Excel through easy to follow tips, tutorials and videos. I'm here to help you get the best out of MS Excel to save time and boost your productivity.
i am using window 10 64 bit error on this syntex:……
1.
ThisRng.ExportAsFixedFormat Type:=xlTypePDF, Filename:= _
myfile, Quality:=xlQualityStandard, IncludeDocProperties:=True, _
IgnorePrintAreas:=False, OpenAfterPublish:=True 2. automatically pick name from cell value & save in predefine location(d:/jobcard/*.pdf thanks for help in advance Reply
Hello, I am desperatly looking for a way to export a form to PDF without using any plugins or external software. Is this in anyway possible? Reply
Jessica Riverahello, i have a sheet that has a pivot and that pivot pulls in multiple different products with information below, is there a macro where i can name all of the products and it will create a pdf for every single product off the pivot without have to go one by one? Reply
I have a invoice Template with VBA code as below which Prints 4 Copies of Invoice With Changing Cell value (L1) in each sheet with Array as defined in Macro. I need to save this as PDF file as wellafter printing with all these 4 Sheet in a single PDF file with continuous 4 pages each having cell value(L1) as defined by Array. Any Advice in this regard shall be highly appreciated. Syed. Sub PrintINVOICEQuadtriplicate() Dim i As Integer
Dim VList As Variant VList = Array(“ORIGINAL FOR RECIPIENT”, “DUPLICATE FOR TRANSPORTER”, “TRIPLICATE FOR SELLER”, “”)
For i = LBound(VList) To UBound(VList)
Range(“L1”) = VList(i)
ActiveSheet.PrintOut
Next End Sub Reply
Hi, Is there a way to have a predetermined set of cells selected already as opposed to being prompted? and also have all that fit in one page as either landscape or portrait. Thank you in Advance Reply
Option Explicit Sub GeneratePDF_Click()
Dim thisWb As Workbook: Set thisWb = ThisWorkbook
Dim thisWs As Worksheet: Set thisWs = thisWb.Worksheets(“Invoice”) ‘replace with relevant name
Dim newBook As Workbook
Dim newws As Worksheet
Dim pathToNewWb As String
Dim uKeys(1 To 3) As Variant
Dim currentPath, columnWithKey, numCols, numRows, dataStartRow, uKey, columnKeyName
Dim i As Integer
Dim rng As Range, Option1 As Range
Dim Filename As String
Dim dropdown1 As DropDown
Dim C As String Filename = “Test” Dim wksAllSheets As Variant
Dim wksSheet1 As Worksheet Dim shtAry() ‘nobody likes flickering screens
Application.ScreenUpdating = False
‘remove any filter applied to the data
thisWs.AutoFilterMode = False ‘get the path of the workbook folder
currentPath = Application.ThisWorkbook.Path ‘Set the stage
‘###Hardcode###
‘columnKeyName = “Facility” ‘name of the column with the facility values
dataStartRow = 7 ‘this is a pure guess, correct as relevenat. Use the header row index
pathToNewWb = currentPath & “/Business Plans.xlsx” ‘ where to put the new excel, if you want a saveas prompt you should google “Application.FileDialog(msoFileDialogSaveAs)”
‘dropdown1 = “F7”
i = 1
Set rng = Evaluate(Range(“F7”).Validation.Formula1)
‘Set rng = Range(“F7”)
For Each Option1 In rng
uKeys(i) = Option1.Value
i = i + 1
Next Option1
For i = LBound(uKeys) To UBound(uKeys)
Debug.Print uKeys(i)
Next i ‘uKeys = Range(“C2:C5”).Value
‘###Hardcode End###
‘columnWithKey = thisWs.Range(dataStartRow & “:” & dataStartRow).Find(what:=columnKeyName, LookIn:=xlFormulas).Value numCols = thisWs.UsedRange.Columns.Count ‘extract the index of the last used row in the worksheet
numRows = thisWs.UsedRange.Rows.Count ‘create the new workbook
Set newBook = Workbooks.Add ‘loop the facilities, and do the work
For Each uKey In uKeys ‘Filter the keys column for a unique key
‘thisWs.Range(thisWs.Cells(7, 6), thisWs.Cells(numRows, numCols)).AutoFilter field:=”F7″, Criteria1:=uKey
‘thisWs.Range(thisWs.Cells(7, 6)).Select ‘Range(“F7”).Value = Range(Range(“F7”).Validation.Formula1)(2).Value Cells(7, 6) = uKey ‘copy the sheet
thisWs.UsedRange.Copy ‘Create a new ws for the facility, and paste as values
Set newws = newBook.Worksheets.Add
ActiveWindow.Zoom = 90
With newws
ActiveWindow.Zoom = 90
.Name = uKey ‘I assume the name of the facility is the relevant sheet name
ActiveWindow.Zoom = 90 .Range(“B1:F25”).PasteSpecial xlPasteValues
.Range(“B1:F25”).PasteSpecial Paste:=xlPasteColumnWidths
.Range(“B1:F25”).PasteSpecial Paste:=xlPasteFormats
‘.Range(“B1:F27”).PasteSpecial Paste:=xlPasteFormulasAndNumberFormats
‘.Range(“B1:F27”).PasteSpecial Paste:=xlPasteAllUsingSourceTheme, Operation:=xlNone, _
SkipBlanks:=False, Transpose:=False .Rows(3).Select
Selection.RowHeight = 43.5
.Rows(4).Select
Selection.RowHeight = 69
.Rows(5).Select
Selection.RowHeight = 33
.Rows(6).Select
Selection.RowHeight = 24.75
.Rows(7).Select
Selection.RowHeight = 27.75
.Rows(9).Select
Selection.RowHeight = 24.75
.Rows(12).Select
Selection.RowHeight = 19.5
.Rows(13).Select
Selection.RowHeight = 49.5
.Rows(14).Select
Selection.RowHeight = 34
.Rows(15).Select
Selection.RowHeight = 34
.Rows(16).Select
Selection.RowHeight = 34
.Rows(17).Select
Selection.RowHeight = 34 .Rows(22).Select
Selection.RowHeight = 33 .Rows(23).Select
Selection.RowHeight = 45.75
.Rows(24).Select
Selection.RowHeight = 14.75
.Rows(25).Select
Selection.RowHeight = 15.75
With ActiveSheet.PageSetup
.LeftMargin = Application.InchesToPoints(0.3)
.RightMargin = Application.InchesToPoints(0.3)
.TopMargin = Application.InchesToPoints(1)
.BottomMargin = Application.InchesToPoints(0)
.HeaderMargin = Application.InchesToPoints(0)
.FooterMargin = Application.InchesToPoints(0)
‘.Orientation = xlLandscape
.Orientation = xlPortrait
.PaperSize = xlPaperLetter
.Zoom = False
.FitToPagesWide = 1
.FitToPagesTall = 1
End With
End With ‘remove autofilter (paranoid parrot)
thisWs.AutoFilterMode = False Next uKey ‘save the new workbook
newBook.SaveAs pathToNewWb With ActiveSheet.PageSetup ReDim shtAry(3) ‘ this is an array of length 2
For i = 1 To 4
shtAry(i – 1) = Sheets(i).Name
Debug.Print Sheets(i).Name
Next i
Sheets(shtAry).Select
Debug.Print ThisWorkbook.Path & “”
.LeftMargin = Application.InchesToPoints(0.3)
.RightMargin = Application.InchesToPoints(0.3)
.TopMargin = Application.InchesToPoints(1)
.BottomMargin = Application.InchesToPoints(0)
.HeaderMargin = Application.InchesToPoints(0)
.FooterMargin = Application.InchesToPoints(0)
‘.Orientation = xlLandscape
.Orientation = xlPortrait
.PaperSize = xlPaperLetter
.Zoom = False
.FitToPagesWide = 1
.FitToPagesTall = 1
End With ActiveSheet.ExportAsFixedFormat xlTypePDF, ThisWorkbook.Path & “/” & Filename & “.pdf”, Quality:=xlQualityStandard, IncludeDocProperties:=True, IgnorePrintAreas:=False, OpenAfterPublish:=False
newBook.Close
End Sub Reply
‘uKeys = Range(“C2:C5”).Value
‘###Hardcode End###
‘columnWithKey = thisWs.Range(dataStartRow & “:” & dataStartRow).Find(what:=columnKeyName, LookIn:=xlFormulas).Value numCols = thisWs.UsedRange.Columns.Count ‘extract the index of the last used row in the worksheet
numRows = thisWs.UsedRange.Rows.Count ‘create the new workbook
Set newBook = Workbooks.Add ‘loop the facilities, and do the work
For Each uKey In uKeys ‘Filter the keys column for a unique key
‘thisWs.Range(thisWs.Cells(7, 6), thisWs.Cells(numRows, numCols)).AutoFilter field:=”F7″, Criteria1:=uKey
‘thisWs.Range(thisWs.Cells(7, 6)).Select ‘Range(“F7”).Value = Range(Range(“F7”).Validation.Formula1)(2).Value Cells(7, 6) = uKey ‘copy the sheet
thisWs.UsedRange.Copy ‘Create a new ws for the facility, and paste as values
Set newws = newBook.Worksheets.Add
ActiveWindow.Zoom = 90
With newws
ActiveWindow.Zoom = 90
.Name = uKey ‘I assume the name of the facility is the relevant sheet name
ActiveWindow.Zoom = 90 .Range(“B1:F25”).PasteSpecial xlPasteValues
.Range(“B1:F25”).PasteSpecial Paste:=xlPasteColumnWidths
.Range(“B1:F25”).PasteSpecial Paste:=xlPasteFormats
‘.Range(“B1:F27”).PasteSpecial Paste:=xlPasteFormulasAndNumberFormats
‘.Range(“B1:F27”).PasteSpecial Paste:=xlPasteAllUsingSourceTheme, Operation:=xlNone, _
SkipBlanks:=False, Transpose:=False .Rows(3).Select
Selection.RowHeight = 36
.Rows(4).Select
Selection.RowHeight = 69
.Rows(5).Select
Selection.RowHeight = 33
.Rows(6).Select
Selection.RowHeight = 24.75
.Rows(9).Select
Selection.RowHeight = 24.75
.Rows(10).Select
Selection.RowHeight = 18
.Rows(11).Select
Selection.RowHeight = 18
.Rows(12).Select
Selection.RowHeight = 19.5
.Rows(13).Select
Selection.RowHeight = 49.5
.Rows(14).Select
Selection.RowHeight = 34
.Rows(15).Select
Selection.RowHeight = 34
.Rows(16).Select
Selection.RowHeight = 34
.Rows(17).Select
Selection.RowHeight = 34 .Rows(22).Select
Selection.RowHeight = 33 .Rows(23).Select
Selection.RowHeight = 45.75
.Rows(24).Select
Selection.RowHeight = 14.75
.Rows(25).Select
Selection.RowHeight = 15.75
With ActiveSheet.PageSetup
.LeftMargin = Application.InchesToPoints(0.5)
.RightMargin = Application.InchesToPoints(0.5)
.TopMargin = Application.InchesToPoints(1.5)
.BottomMargin = Application.InchesToPoints(0)
.HeaderMargin = Application.InchesToPoints(0)
.FooterMargin = Application.InchesToPoints(0)
‘.Orientation = xlLandscape
.Orientation = xlPortrait
.PaperSize = xlPaperLetter
.Zoom = False
.FitToPagesWide = 1
.FitToPagesTall = 1
End With
End With ‘remove autofilter (paranoid parrot)
thisWs.AutoFilterMode = False Next uKey ‘save the new workbook
newBook.SaveAs pathToNewWb With ActiveSheet.PageSetup ReDim shtAry(3) ‘ this is an array of length 2
For i = 1 To 4
shtAry(i – 1) = Sheets(i).Name
Debug.Print Sheets(i).Name
Next i
Sheets(shtAry).Select
Debug.Print ThisWorkbook.Path & “”
.LeftMargin = Application.InchesToPoints(0.5)
.RightMargin = Application.InchesToPoints(0.5)
.TopMargin = Application.InchesToPoints(1.5)
.BottomMargin = Application.InchesToPoints(0)
.HeaderMargin = Application.InchesToPoints(0)
.FooterMargin = Application.InchesToPoints(0)
‘.Orientation = xlLandscape
.Orientation = xlPortrait
.PaperSize = xlPaperLetter
.Zoom = False
.FitToPagesWide = 1
.FitToPagesTall = 1
End With ActiveSheet.ExportAsFixedFormat xlTypePDF, ThisWorkbook.Path & “/” & Filename & “.pdf”, Quality:=xlQualityStandard, IncludeDocProperties:=True, IgnorePrintAreas:=False, OpenAfterPublish:=False
newBook.Close
End Sub Reply
Option Explicit Sub GeneratePDF_Click()
Dim thisWb As Workbook: Set thisWb = ThisWorkbook
Dim thisWs As Worksheet: Set thisWs = thisWb.Worksheets(“Invoice”) ‘replace with relevant name
Dim newBook As Workbook
Dim newws As Worksheet
Dim pathToNewWb As String
Dim uKeys(1 To 3) As Variant
Dim currentPath, columnWithKey, numCols, numRows, dataStartRow, uKey, columnKeyName
Dim i As Integer
Dim rng As Range, Option1 As Range
Dim Filename As String
Dim dropdown1 As DropDown
Dim C As String Filename = “Test” Dim wksAllSheets As Variant
Dim wksSheet1 As Worksheet Dim shtAry() ‘nobody likes flickering screens
Application.ScreenUpdating = False
‘remove any filter applied to the data
thisWs.AutoFilterMode = False ‘get the path of the workbook folder
currentPath = Application.ThisWorkbook.Path ‘Set the stage
‘###Hardcode###
‘columnKeyName = “Facility” ‘name of the column with the facility values
dataStartRow = 7 ‘this is a pure guess, correct as relevenat. Use the header row index
pathToNewWb = currentPath & “/Business Plans.xlsx” ‘ where to put the new excel, if you want a saveas prompt you should google “Application.FileDialog(msoFileDialogSaveAs)”
‘dropdown1 = “F7”
i = 1
Set rng = Evaluate(Range(“F7”).Validation.Formula1)
‘Set rng = Range(“F7”)
For Each Option1 In rng
uKeys(i) = Option1.Value
i = i + 1
Next Option1
For i = LBound(uKeys) To UBound(uKeys)
Debug.Print uKeys(i)
Next i Reply
Option Explicit
Sub GeneratePDF_Click()
Dim thisWb As Workbook: Set thisWb = ThisWorkbook
Dim thisWs As Worksheet: Set thisWs = thisWb.Worksheets(“Test”) ‘replace with relevant name
Dim newBook As Workbook
Dim newws As Worksheet
Dim pathToNewWb As String
Dim uKeys(1 To 4) As Variant
Dim currentPath, columnWithKey, numCols, numRows, uKey, dataStartRow, columnKeyName
Dim i As Integer
Dim rng As Range, cel As Range
Dim Filename As String
Filename = “Test” Dim shtAry() ‘nobody likes flickering screens
Application.ScreenUpdating = False
‘remove any filter applied to the data
thisWs.AutoFilterMode = False ‘get the path of the workbook folder
currentPath = Application.ThisWorkbook.Path ‘Set the stage
‘###Hardcode###
columnKeyName = “Facility” ‘name of the column with the facility values
dataStartRow = 1 ‘this is a pure guess, correct as relevenat. Use the header row index
pathToNewWb = currentPath & “/Business Plans.xlsx” ‘ where to put the new excel, if you want a saveas prompt you should google “Application.FileDialog(msoFileDialogSaveAs)” i = 1
Set rng = Range(“C2:C5”)
For Each cel In rng
uKeys(i) = cel.Value
i = i + 1
Next cel
For i = LBound(uKeys) To UBound(uKeys)
Debug.Print uKeys(i)
Next i Reply
‘uKeys = Range(“C2:C5”).Value
‘###Hardcode End###
columnWithKey = thisWs.Range(dataStartRow & “:” & dataStartRow).Find(what:=columnKeyName, LookIn:=xlValues).Column
numCols = thisWs.UsedRange.Columns.Count ‘extract the index of the last used row in the worksheet
numRows = thisWs.UsedRange.Rows.Count ‘create the new workbook
Set newBook = Workbooks.Add ‘loop the facilities, and do the work
For Each uKey In uKeys ‘Filter the keys column for a unique key
thisWs.Range(thisWs.Cells(dataStartRow, 1), thisWs.Cells(numRows, numCols)).AutoFilter field:=columnWithKey, Criteria1:=uKey ‘copy the sheet
thisWs.UsedRange.Copy ‘Create a new ws for the facility, and paste as values
Set newws = newBook.Worksheets.Add
With newws
.Name = uKey ‘I assume the name of the facility is the relevant sheet name
.Range(“A1”).PasteSpecial xlPasteValues
End With ‘remove autofilter (paranoid parrot)
thisWs.AutoFilterMode = False Next uKey ‘save the new workbook
newBook.SaveAs pathToNewWb Reply
Is there a way, when exporting as PDF. to have a print title row (which I currently have put into all the pages of the .pdf), appear on all of the pages EXCEPT the final page? I’ve tried to run this by defining “xPages” as the total count of pages (and then going for xpages -1 – 1) but am unable to run this within the settings for the .pdf export… Is this possible? Reply